ParseError: syntax error, unexpected '=>' (T_DOUBLE_ARROW)
More info is available in the error log.
This is an old revision of the document!
Table of Contents
VM Provisioning with Kickstart and Dynamic Configuration
This page describes the full workflow for automated CentOS VM or bare-metal provisioning using Kickstart and JSON configuration files hosted in Gitea.
—
Overview
The system automatically:
- Installs CentOS from ISO or network.
- Creates users dynamically from a `users.json` file.
- Configures SSH dynamically from a `ssh.json` file (port, authentication, allowed users).
- Clones and executes VM scripts (`buildvm.sh`) from a Gitea repository.
- Supports both test and production deployments.
Configuration files are hosted in:
https://config.tombstones.org.uk:23000/tombstones/vm-scripts/
—
Repository Layout
vm-scripts/
—
JSON Configuration
- users.json* example:
  [
    {
      "username": "vms",
      "ssh_key": "ssh-rsa AAAAB3NzaC1yc2EAAAADAQABAAABAQ...",
      "password": "$6$abcd1234$..."
    },
    {
      "username": "darren",
      "ssh_key": "ssh-rsa AAAAB3NzaC1yc2EAAAADAQABAAABAQ..."
    }
  ]
- ssh.json* example:
  {
    "port": 22022,
    "password_authentication": "no",
    "permit_root_login": "no",
    "allow_users": ["vms", "darren"]
  }
—
[](https://wiki.darrenwindle.co.uk/lib/plugins/dirtylittlehelper/mermaid/editor/#/edit/eyJjb2RlIjoic3RhdGVEaWFncmFtLXYyXG4gICAgWypdIC0tPiBCb290X1ZNXG5cbiAgICBCb290X1ZNOiBCb290IFZNIC8gQmFyZS1NZXRhbCBIb3N0XG4gICAgQm9vdF9WTSAtLT4gS2lja3N0YXJ0X0Jvb3RcblxuICAgIEtpY2tzdGFydF9Cb290OiBLaWNrc3RhcnQgSVNPIC8gTmV0d29yayBCb290XG4gICAgS2lja3N0YXJ0X0Jvb3QgLS0-IFByZV9QYWNrYWdlc1xuXG4gICAgUHJlX1BhY2thZ2VzOiBJbnN0YWxsIHBhY2thZ2VzICglcHJlICYgJXBhY2thZ2VzKVxuICAgIFByZV9QYWNrYWdlcyAtLT4gUG9zdF9TZWN0aW9uXG5cbiAgICBQb3N0X1NlY3Rpb246ICVwb3N0IFNlY3Rpb25cbiAgICBQb3N0X1NlY3Rpb24gLS0-IERvd25sb2FkX1VzZXJzXG4gICAgUG9zdF9TZWN0aW9uIC0tPiBEb3dubG9hZF9TU0hcblxuICAgIERvd25sb2FkX1VzZXJzOiBEb3dubG9hZCB1c2Vycy5qc29uIGZyb20gR2l0ZWFcbiAgICBEb3dubG9hZF9TU0g6IERvd25sb2FkIHNzaC5qc29uIGZyb20gR2l0ZWFcblxuICAgIERvd25sb2FkX1VzZXJzIC0tPiBDcmVhdGVfVXNlcnNcbiAgICBEb3dubG9hZF9TU0ggLS0-IENvbmZpZ3VyZV9TU0hcblxuICAgIENyZWF0ZV9Vc2VyczogQ3JlYXRlIExpbnV4IHVzZXJzIGR5bmFtaWNhbGx5XG4gICAgQ29uZmlndXJlX1NTSDogQ29uZmlndXJlIFNTSCBzZXJ2ZXIgKHBvcnQsIGF1dGgsIGFsbG93X3VzZXJzKVxuXG4gICAgQ3JlYXRlX1VzZXJzIC0tPiBDbG9uZV9TY3JpcHRzXG4gICAgQ29uZmlndXJlX1NTSCAtLT4gQ2xvbmVfU2NyaXB0c1xuXG4gICAgQ2xvbmVfU2NyaXB0czogQ2xvbmUgVk0gc2NyaXB0cyByZXBvIChidWlsZHZtLnNoKVxuICAgIENsb25lX1NjcmlwdHMgLS0-IFJ1bl9TY3JpcHRzXG5cbiAgICBSdW5fU2NyaXB0czogUnVuIGJ1aWxkdm0uc2hcbiAgICBSdW5fU2NyaXB0cyAtLT4gVk1fUmVhZHlcblxuICAgIFZNX1JlYWR5OiBWTSBEZXBsb3ltZW50IENvbXBsZXRlXG4gICAgVk1fUmVhZHkgLS0-IFRlc3RfVmVyaWZ5XG5cbiAgICBUZXN0X1ZlcmlmeTogVGVzdCBTU0ggbG9naW4sIHZlcmlmeSBzY3JpcHRzLCBsb2dzXG4gICAgVGVzdF9WZXJpZnkgLS0-IFsqXVxuXG5cbiAgICAgICAgICAgICIsIm1lcm1haWQiOnt9LCJ1cGRhdGVFZGl0b3IiOmZhbHNlfQ)
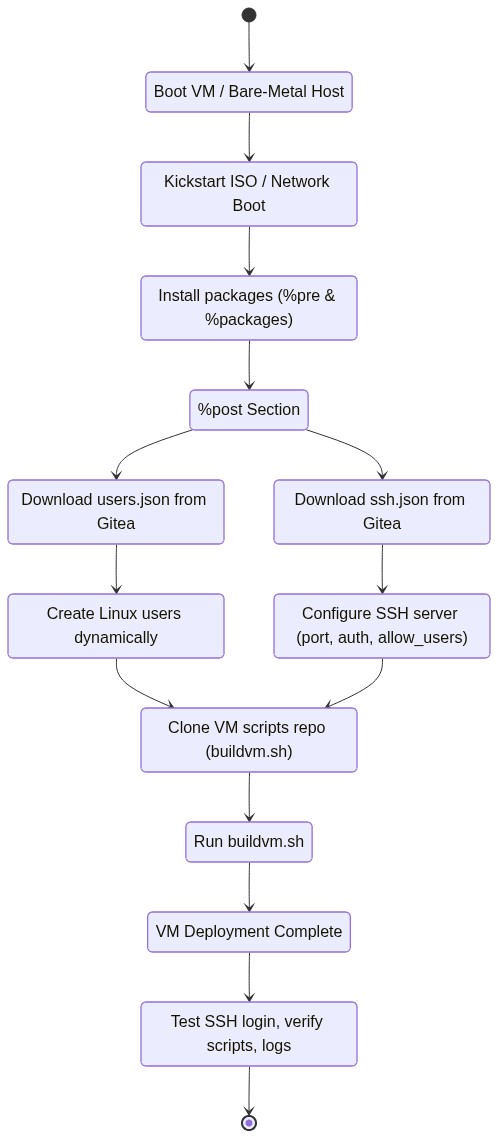
Workflow Diagram
+—————————-+
| Boot VM / Bare-Metal Host |
+————+—————+
| Kickstart ISO / Network Boot |
+————+——————+
| %pre & %packages |
| (curl, jq, git, SSH) |
+————+———+
| %post Section |
+————+———+
| Download users.json | —> | Create users dynamically |
+—————————+ +———————–+
| Download ssh.json | —> | Configure SSH server |
+—————————+ +———————–+
| Clone VM scripts repo (vms) |
+———————————-+
| Run buildvm.sh |
+————————+
| VM Deployment Complete |
+————————+
| Test SSH login, verify scripts |
| and logs |
+——————————-+
—
Preparation Steps
1. Log into the VM (or bare-metal host) as root. 2. Create a `prepare-vm.sh` script:
  #!/bin/bash
  yum update -y
  yum install -y curl jq git openssh-server sudo vim
  systemctl enable --now sshd
  iptables -I INPUT -p tcp --dport 22022 -j ACCEPT
  setenforce 0
  sed -i 's/^SELINUX=enforcing/SELINUX=permissive/' /etc/selinux/config
  if ! id vms &>/dev/null; then
      useradd -m -s /bin/bash vms
      echo "vms:Password123" | chpasswd
      echo "vms ALL=(ALL) NOPASSWD:ALL"> /etc/sudoers.d/vms
      chmod 440 /etc/sudoers.d/vms
  fi
3. Make it executable and run:
  chmod +x /root/prepare-vm.sh
  sudo /root/prepare-vm.sh
4. Verify package installation and SSH:
  curl --version
  jq --version
  git --version
  sshd -T | grep port
  id vms
5. Verify network access to Gitea:
  curl -I https://config.tombstones.org.uk:23000/tombstones/vm-scripts/users.json
  curl -I https://config.tombstones.org.uk:23000/tombstones/vm-scripts/ssh.json
—
Kickstart Deployment
Boot the VM using the CentOS ISO and pass the Kickstart URL:
linux inst.ks=https://config.tombstones.org.uk:23000/tombstones/vm-scripts/ks.cfg
The Kickstart `%post` section will:
- Download `users.json` and `ssh.json`.
- Create Linux users dynamically.
- Configure SSH server according to JSON settings.
- Clone `buildvm.sh` repo for `vms`.
- Run `buildvm.sh` to complete VM provisioning.
Check logs in `/root/ks-post.log` if needed.
—
Post-Deployment
1. SSH into the new VM:
ssh -p 22022 vms@2. Verify the `vms` home directory contains the cloned scripts:
ls /home/vms/vm-scripts
3. Confirm users exist and have proper SSH access.
—
Notes
* JSON-driven configuration allows dynamic management of users and SSH without modifying Kickstart. * Firewall and SELinux adjustments are handled in `prepare-vm.sh`. * Test in a VM before deploying on bare-metal. * Update JSON files in Gitea to manage changes dynamically.
JSON Configuration Reference
| File | Key | Purpose | Example |
|---|---|---|---|
| users.json | username | Linux account to create | "vms" |
| users.json | ssh_key | Public SSH key for user login | "ssh-rsa AAAAB3Nza…" |
| users.json | password | Optional hashed password | "$6$abcd1234$…" |
| ssh.json | port | SSH server listening port | 22022 |
| ssh.json | password_authentication | Enable/disable password login | "no" |
| ssh.json | permit_root_login | Allow root login via SSH | "no" |
| ssh.json | allow_users | List of users allowed to log in via SSH | ["vms","darren"] |